As a triathlon journalist and wetsuit repair expert I get excited about practical fixes that save gear and keep athletes in the water. This article teaches solid, advanced wetsuit repair methods you can use or ask a pro to perform. You will learn how to diagnose damage, choose the right adhesives, patch seams, handle zippers and valves, and protect key panels for longer life.
Why proper wetsuit repair matters
Wetsuit repair matters for performance and safety. A small tear can let in water, change buoyancy, and hurt speed. Fixing the suit correctly keeps your body position steady and your swim efficient. That matters at race pace and during long open-water training sessions.
As a triathlete, you depend on your suit every season. Proper repair keeps fit and stretch consistent. It also cuts cost. A well-repaired wetsuit can last many seasons. You do not need a new suit for every rip or leaking zipper.
Good repairs also protect insulation and buoyant panels. When these elements fail they change how you float and how you kick. Repairing the suit the right way restores these properties and keeps you safe and fast in the water.
Diagnosing wetsuit damage
Start with a full check before you fix anything. Lay the suit flat in good light and gently stretch problem areas. Look for thin spots, small tears, seam gaps, and worn face neoprene on shoulders and knees. Write down every issue so you have a repair plan.
Next, test zippers and seals. Open and close the zipper several times and watch for bite points or missing teeth. Check valves and glued joints. If the zipper hangs or the valve leaks, the problem is not just cosmetic. You need to decide between repair and replacement parts.
Finally, test buoyancy panels and internal taping. Feel along seams inside the suit for loose tape or glue. Press on buoyant inserts to see if they compress oddly or move. These signs point to internal failures that need careful work and correct adhesive choice.
Advanced patching and seam repair techniques
Patching and seam work must restore stretch and strength without making the suit stiff. That means using thin, flexible patches and the right glue. Many repairs fail because the patch is too thick or the adhesive is wrong. I will explain how to match materials and keep flexibility.
Before any patch, clean and sand the area lightly. Remove salt, sunscreen, and old glue with warm water and a mild cleaner. Let the suit dry completely. Light sanding helps glue bond to the neoprene without weakening it.
Work in a warm, dust-free place and clamp patches until glue cures. Proper clamping keeps the edges tight and prevents water from creeping under the patch. Follow cure times on the adhesive but allow extra time if the room is cool.
External patches for tears and abrasions
External patches are visible fixes for rips and big abrasions. They add a layer of protection and keep the suit watertight. Use thin neoprene patches that match the suit thickness to keep flex and comfort.
Cut the patch slightly larger than the damage and round the corners. Sharp corners lift and peel. Apply glue to both the patch and the suit, wait the specified flash time, and press firmly. Use a roller or a smooth dowel to remove air pockets and to make a full bond.
Once clamped, let the glue cure fully. Avoid stretching the repair during cure. Test the patch by gently bending the area and checking for any lift. If the patch remains firm and flexible, the repair is complete.
Internal seam taping and reinforcement
Internal seam work often fixes leaks that external patches cannot. Seam tape restores internal strength and seals stitch holes. Use thin tape designed for neoprene, not cloth tape. The right tape remains flexible and bonds well to cured adhesive.
To prepare, remove loose stitching and clean the seam. Apply neoprene cement to both sides of the seam. Place the tape inside the suit and press it firmly along the seam. Use a roller to set the tape and keep the seam aligned and flat.
Allow full cure before testing in water. If seams still leak, add a second tape layer or use a thin internal patch. Do not over-layer tape. Too many layers stiffen the suit and reduce mobility.
Adhesives and glues that work best
The right adhesive is critical for repairs that last. Not all glues bond neoprene well. Use neoprene-specific cement and contact adhesives made for wetsuits. These products stay flexible and resist salt and sun damage.
Read product instructions and match glue to work type. For seams and thin repairs, neoprene cement is preferred. For larger external patches, a contact adhesive that bonds quickly is useful. Check cure times and working temperatures to avoid weak bonds.
When applying glue, use thin, even coats. Thick glue layers can stay soft or crack. A thin bed of adhesive maintains stretch and resists peeling. Always test a small area if you are unsure how a glue reacts to your suit’s material.
Replacing zippers and valves
Zippers and valves are common failure points. A stuck zipper or a loose valve can ruin a race. Fixing them often returns the suit to service more cheaply than replacing the entire suit. The key is careful removal and precise reinstallation.
When you replace a zipper, remove old glue and stitches carefully. Use new zipper tape sized for wetsuits. Sew the zipper in with a curved needle and nylon thread, or use adhesive plus stitches for strength. Keep stitches shallow to avoid creating new leaks.
Valves need clean bonding surfaces. Remove any old sealant, sand lightly, and use a neoprene adhesive made to bond to the valve material. Hold the valve in place until it cures fully. Test with a water check before using in open water.
Restoring buoyancy panels and internal tapes
Buoyancy panels help your position in the water. If they shift or compress, your swim changes. Repairing these panels is delicate. You must restore placement and bond without crushing the foam or changing shape.
Open the inner lining where possible and inspect the panel area. Use a compatible adhesive that bonds foam to neoprene without dissolving it. Apply glue in a thin layer and press panels back to original position. Support the area until the glue cures fully.
If internal tape has separated, replace it with neoprene seam tape. Make sure the tape covers the entire seam area and lay it flat to avoid bulges. Test drive the suit in a pool to check position and buoyancy before race day.
Tools and materials for professionals
Good tools make a big difference. Professionals use rollers, curved needles, neoprene scissors, and sanding pads. These tools help you trim patches, set seams cleanly, and remove old glue without damaging the suit. A steady hand and the right kit mean fewer mistakes.
Below is a recommended kit for advanced wetsuit repair. This list groups the most useful tools and explains why each item matters. Keep items organized so you can work efficiently and avoid delays during glue cure times.
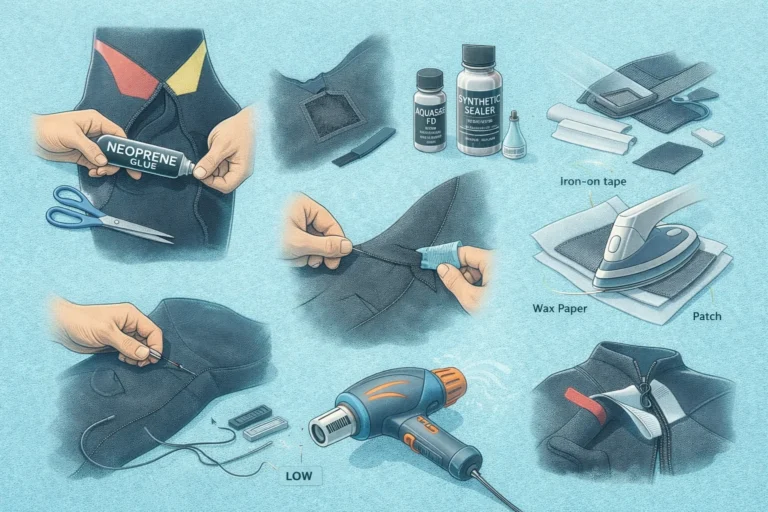
- Neoprene cement and contact adhesive: For seams, patches, and bonding parts.
- Thin neoprene patches and seam tape: To match suit thickness and retain stretch.
- Curved and heavy-duty needles with nylon thread: For re-sewing zippers and reinforcement.
- Small rollers and smooth dowels: To press patches and remove air pockets evenly.
- Sanding pads and alcohol wipes: To clean and roughen surfaces before gluing.
- Clamps and elastic straps: To hold repairs flat while glue cures.
Having these items allows a pro to perform strong, flexible repairs. Keep extra stock of adhesives and patches so you can address issues quickly after diagnosis.
Step-by-step advanced repair workflow

A clear workflow reduces errors. Start with diagnosis, then clean the area, select the right material, perform the repair, and test. Each step takes time, but rushing usually causes failure. I walk through the process many times with athletes and the results are strong and reliable repairs.
Here is a concise step list that professionals follow. Each step helps keep the suit flexible and watertight. Follow cure times and test the suit in calm water before race use.
- Inspect and document all damage; plan needed materials and tools.
- Clean with mild soap and alcohol wipes; sand lightly where glue will bond.
- Cut and shape patches; round corners; prepare seam tape as needed.
- Apply thin, even adhesive layers; allow specified flash time before joining.
- Press and roll the repair; clamp securely and allow full cure time per product.
- Reinforce with stitches if needed; perform a pressure or water test before use.
Use this workflow every time. It helps you finish repairs that perform well under race stress and last over multiple seasons.
Preventive care and storage to avoid future repairs
Preventive care is the best way to reduce repairs. Rinse your wetsuit with fresh water after every open-water session. That removes salt, sand, and sunscreen that break down glue and material. Let the suit dry inside out first, then flip to finish drying.
Store the suit flat or on a wide hanger in a cool, shaded place. Avoid folding sharp creases or leaving the suit in direct sun. UV light and heat dry out neoprene and weaken seams. Simple care extends life and reduces the need for advanced wetsuit repair.
Rotate suits if you train often. Let one suit rest between heavy sessions to keep it from compressing in the same areas. This habit protects knees, shoulders, and buoyant panels that get the most wear.
Common mistakes and how to avoid them
Many repairs fail because of rushed prep or wrong materials. The top mistake is not cleaning the bond area properly. Glue applied to salt, oil, or old adhesive will not stick. Always clean thoroughly and sand lightly before gluing.
Another common error is using thick or wrong patches. Thick patches reduce stretch and cause edge lift. Match the patch thickness to the suit and round corners to avoid peeling. Use flexible adhesive and keep layers thin to maintain movement.
Finally, do not test in rough water too soon. Allow adhesives to cure fully. If you need the suit quickly, plan repairs well before a race. When in doubt, consult a repair pro. A careful fix beats a rushed one in every case.
Key Takeaways
Wetsuit repair is a smart skill for triathletes. Proper repairs save money, keep performance high, and extend suit life. Focus on diagnosis, correct adhesives, thin patches, and careful seam work. These steps offer strong, flexible repairs that hold up in training and racing.
Maintain a good tool kit and follow a clear workflow. Use neoprene cement, seam tape, and thin patches to match suit properties. Preventive care such as rinsing, proper storage, and rotating suits reduces the need for advanced repairs.
As a triathlon journalist and repair expert I recommend practicing simple fixes and working with a pro for complex issues. With the right approach you will keep your suit race-ready and enjoy more confident swims. Remember to include wetsuit repair in your regular gear checks, just like advanced gear maintenance and your bike tune-up routines.