Fix leaky wetsuit fast and keep your swim smooth. As a triathlon journalist and wetsuit expert I get excited about practical fixes. This guide shows clear, step-by-step repair techniques, quick race-day fixes, and long-term care so your suit stays reliable.
This article explains common causes, the tools you need, how to perform small repairs, and when to replace the suit. Read on for clear, proven tips that help you get back to training and racing with confidence.
Common causes
Wetsuits leak for a few predictable reasons. Age and regular use break down neoprene. Small cuts and punctures appear from fingernails, rocks, or packing. Seams and zippers weaken after many entries and exits in salt or chlorinated water.
Another frequent cause is stress on seals. Wrist, ankle, and neck seals get stretched and work loose. That allows cold water to flow in. The same action that helps you move can make the suit less watertight over time.
Improper storage and handling make problems worse. Sunlight, heat, or folding the suit tightly will change the neoprene shape. That increases the chance of leaks. Spotting the cause helps you choose the right repair method.
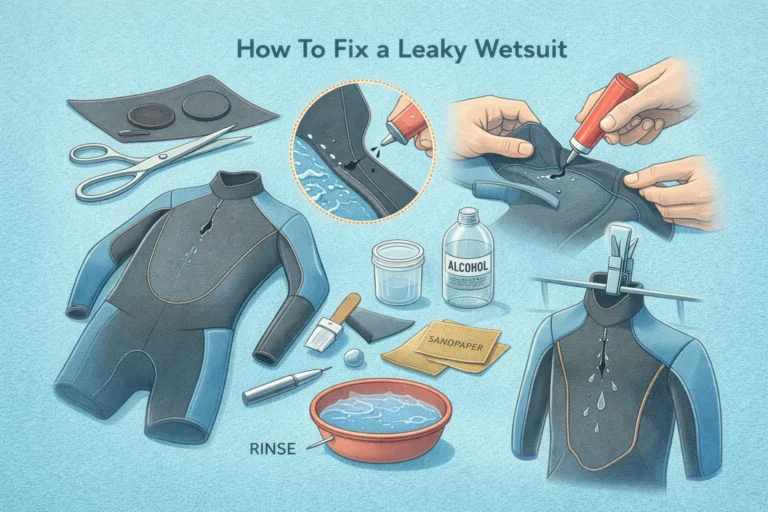
Tools and materials

Before you start you need the right supplies. The correct materials make the repair last and feel comfortable. I recommend gathering everything before you begin so you do not rush a delicate repair.
Below is a suggested list of tools and supplies to fix common wetsuit leaks. These are items I use and trust when covering triathlon gear issue solutions for riders and swimmers.
- Neoprene cement or wetsuit glue
- Neoprene repair patches (thin neoprene sheets)
- Seam tape or liquid seam sealant
- Fine sandpaper or emery cloth
- Scissors, needle, and thread (nylon)
- Masking tape, rubbing alcohol, clean cloth
Buy products made for wetsuits. Generic glues ruin neoprene and may leave stiff patches. Keeping the gear simple and correct keeps repairs flexible and comfortable. Good tools make the repair easier and improve results.
Quick fixes
Before a race you need fast, effective fixes. Quick fixes will not replace proper repairs, but they can save a swim. Learn simple methods that take minutes and keep the suit usable until you can do a full repair.
One fast method is using neoprene cement to seal small punctures from the inside. Clean the area, apply a thin coat, let it tack, then press the edges together. This method works well for small holes and reduces flushing during a swim.
Another quick option is using a thin neoprene patch with adhesive backing. Trim the patch to size and press firmly from the inside. For zipper issues, use flexible seam tape over the seam to limit water entry. These steps will buy you time on race day.
Repairs to fix leaky wetsuit
Spot repairs are the heart of fixing a leaky wetsuit. Take time to clean and prepare the area. Proper surface preparation helps glue and patches bond well. Rushing often causes the repair to fail.
Start by rinsing the suit in fresh water and letting it dry. Use rubbing alcohol on a clean cloth to remove oils and salt from the repair area. Lightly roughen the neoprene surface with fine sandpaper to improve grip for glue and patches.
Apply neoprene cement sparingly. Too much glue can create a hard spot. Allow the cement to reach the tacky phase before joining surfaces. Press the repair area firmly and let it cure per the product instructions. Patience here results in a flexible and long-lasting repair.
Small cuts and punctures
Small cuts under 1 cm are common from hooks, rocks, or fingernails. These need careful treatment so they do not widen. Handle these small fixes gently to preserve the suit’s shape and flexibility.
Clean the area and remove any loose material. If the cut is simple and straight, place a thin neoprene patch on the inside. Use neoprene cement for bonding, then press and hold until tacky. Avoid bulking up with thick adhesive.
After the glue cures, check the outside of the suit. If the outer skin is split, use a tiny dab of glue on the outside to seal edges. Keep the repair smooth. You want a flexible finish that will not catch on other gear.
Seams and zippers
Seam and zipper leaks are often the hardest to fix. Seams take the most stress and may show wear over a long distance. Zippers take repeated mechanical stress and may allow water entry even when the zipper looks fine.
For seam leaks use liquid seam sealant or stitch and tape methods. If the seam has opened along several centimeters, stitch it with a fine, tight overlock stitch to bring edges together. Then apply seam tape or liquid sealant to reinforce the area and prevent future leaks.
Zipper leaks often come from the zipper tape area. Clean the tape and apply a thin line of neoprene cement or seam sealant along the zipper edges from the inside. This glues the fabric to the zipper tape and reduces flushing. If the zipper itself is broken, plan for professional repair or replacement.
Step-by-step repair routine
Work in a clean, warm space. Cold glue cures slowly. Use a flat table and good light. Lay the suit flat on a towel and position the damaged area so you can work on it without strain.
First, mark the area. Then clean with fresh water and alcohol. Lightly sand both surfaces. Apply a thin, even coat of neoprene cement to both sides. Wait until it becomes tacky. This ensures a strong bond.
Press the surfaces together and hold firmly for the time the glue maker recommends. Use masking tape to keep the repair in place while it cures. After curing, remove any excess glue with care. Test the area by stretching gently to confirm flexibility.
Care and prevention
Prevention beats repair. Proper care keeps the seals and seams healthy and reduces the chance you will need to fix leaky wetsuit often. Simple daily steps add up to longer life for your suit.
Rinse your suit with fresh water after every swim. Salt and chlorine accelerate neoprene degradation. Hang inside out to dry in shade. Avoid direct sunlight and heaters. Heat and UV damage neoprene quickly.
Use a soft hanger and avoid folding the suit tightly. When packing, roll loosely and avoid sharp items. If you store the suit for long periods, keep it flat or hung. These small habits are practical gear issue solutions for all triathletes.
When to replace
Sometimes repair is not enough. Replacement is smart when the suit no longer fits well or when multiple repairs cut into comfort. A suit that costs speed or warmth in a race is a liability.
Look for widespread thinning, large areas of delamination, or multiple failures in seams and seals. If the suit has lost buoyancy in key panels, repairs will not restore the original performance. In that case, replacement is the best move.
Decide based on performance, safety, and cost. A new suit is an investment in speed and comfort. For many competitive athletes, replacing a suit is the correct long-term choice when repairs become frequent.
Key Takeaways
Fix leaky wetsuit problems quickly when you can, and plan full repairs later when time permits. Clean the area well, use approved neoprene cement, and keep repairs thin and flexible. These steps help you stay warm and fast in open water.
Carry a small repair kit to races for quick fixes and practice good care habits to avoid frequent problems. Rinse, dry in shade, and store carefully to protect seals and seams. Those routines are reliable gear issue solutions every triathlete should use.
When in doubt, choose a professional repair or replacement. Accurate repairs extend life, but a heavily worn suit should be replaced. Follow these methods and your wetsuit will serve you well in training and racing.