Bike chain break can happen at the worst time. You might be racing, training, or commuting. As a triathlon journalist and rider, I know the panic and the calm you need. This article explains what to do right away, how to repair on the road, how to fix at home, what to carry, and how to stop it from happening again.
Why a bike chain break happens
Chains last a long time when you care for them. But stress, wear, and poor setup create weak points. A chain that has worn pins or bent links can fail suddenly. Mechanical damage from crashes or stones also causes failure. Understanding causes helps you prevent the next bike chain break.
Wear is the most common cause. Chains stretch as pins and bushings wear. That stretching increases load on individual links. Over time, the weakest link takes more stress and can snap. Keep track of chain wear with a simple gauge or by measuring chain length. This helps keep replacements on schedule.
Improper shifting and poor maintenance also cause failure. If you shift under too much torque or run a poorly adjusted derailleur, the chain can twist or catch. Dirt and grit accelerate wear by grinding at metal contact points. Regular cleaning and correct shifting reduce those risks. As a triathlete, consistent maintenance matters for training and race day.
Impact damage and incompatible parts are less common but real. A crash can bend or break links. Using a chain that is too narrow or too wide for your cassette can place odd forces on pins. When you assemble a bike, match components carefully. After any hard hit, inspect the chain for bends, kinks, or missing pins.
Immediate steps for a bike chain break
When a chain breaks, act fast and stay calm. First, move off the road if you can. Safety matters more than speed. Put your bike in a safe spot where you can work and see traffic. If you are racing or on a tight schedule, prioritize getting moving again safely over doing a perfect repair.
Second, assess the damage. Look for a clean break, a removed pin, or a bent link. A clean break usually means a link snapped at a pin. A removed pin means the link has separated but may be rejoined. Bent links will not roll through the cassette smoothly and may need removal. Make a quick mental plan before you touch tools.
Third, check for other damage. A broken chain can jam into the derailleur and bend it. Make sure the rear wheel spins freely once the chain is off. If the derailleur hanger looks twisted, do not force a ride. A bent hanger will ruin shifting and may make the bike unsafe to ride. If you suspect serious frame or wheel damage, prioritize getting the bike to a shop or arranging a ride home.
Finally, decide whether to repair or walk. If you have tools and a spare pin or quick link, you can often fix it and continue. If you do not, or if the repair would leave the chain weak, consider calling for a ride. For triathletes, a short delay may be better than a dangerous limp to the finish.
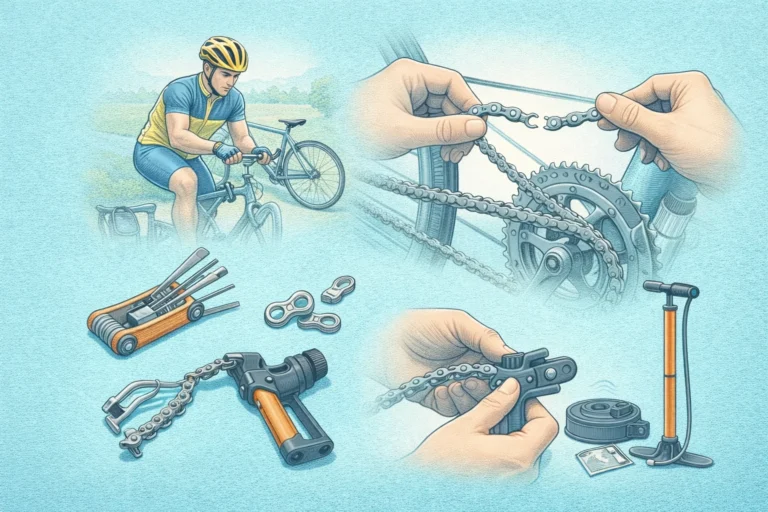
Quick roadside repairs

Small, clear steps help you repair a bike chain break on the road. Keep calm and move methodically. The goal is to get you riding again as safely and quickly as possible. Below are common quick fixes you can do with minimal tools.
- Use a master quick link. If your chain has a compatible quick link and you carry one, reconnect the chain by inserting the link and pulling the chain tight. Rotate the pedals slowly until the link seats. Check for stiff links and flex them gently to free the link.
- Use a spare chain pin. With a chain tool, press a spare pin into the link and break the pin head as needed. Clean a small area before rejoining to reduce grit. Test the link under light load before pushing hard on the pedals.
- Remove damaged link(s). If a link is bent or missing a pin, remove the damaged section using a chain tool. This shortens the chain. If the shortened chain still fits the drivetrain and the smallest chainring and cog combination, you can ride to a shop. Avoid cross-chaining; use lower gears.
- Emergency single-speed push. If repair is impossible, you can remove the chain and push or walk the bike, or ride it as a single speed if you can route the chain securely. This is only for short distances and low speeds, and you must ensure the chain will not get caught.
Each of these steps will work with common tools: a small multi-tool with a chain tool, a quick link, or a spare pin. Test the repair in a safe area before rejoining traffic. If shifting feels off, avoid hard sprints or climbs until you reach a full repair or proper replacement.
At-home chain repair and full replacement
At home you have time and space to do a thorough repair or replacement. Start by cleaning the chain and inspecting every link. A broken chain may hide other worn areas. A full inspection reveals stretched sections, bent plates, or cracks. Replace any part that shows serious wear or damage.
Replacing a chain often means removing a few links for a clean fit. Use a chain tool to push pins in and out properly. If your chain uses a quick link, install the new link last so you can remove it again easily. Make sure the new chain is the right speed rating for your cassette and chainrings. Mixing incompatible parts shortens component life.
Once the new chain is installed, set your limits and adjust the derailleur if needed. Shift through all gears and check for rubbing, skipping, or noise. Fine-tune barrel adjusters so shifting is crisp. If you had removed bent parts like a derailleur hanger, straighten or replace them before riding hard.
After repair, clean and lubricate the chain properly. Apply lube sparingly to each roller and wipe off excess with a rag. Excess lube attracts dirt and speeds wear. Regular wrenching and a small routine will make your chain last longer and lower the chance of another bike chain break.
Preventing a bike chain break
Prevention is a simple habit that saves time and stress. A regular maintenance schedule keeps chains safe and reliable. Clean the chain after wet or dirty rides, and check for wear every few hundred miles. Replace a chain before it reaches the wear limit to protect cassette and chainring teeth.
Proper shifting technique also reduces risk. Avoid shifting under high pedal torque. Ease pressure briefly when changing gears on climbs and sprints. Training your hands to ease off the pedals when you shift can stop many failures. For racing, practice smooth shifts under simulated race loads so the habit is automatic.
Use the right parts for your bike. A chain rated for 11 or 12 speed must match the cassette width. Using the wrong chain forces links to bend. When you fit a new chain, read the manufacturer advice. This protects the drivetrain and lowers the chance of a sudden failure during a training session or race.
Finally, include chain checks in pre-ride routines. A quick lift and flex test, plus a glance at chain wear and derailleur alignment, takes seconds. If you notice unusual noise or skipping on the way out, stop and inspect. Early action prevents a mid-ride bike chain break and keeps you on course.
Essential tools to carry
Carry a small set of tools that solves most roadside chain problems. You do not need a big toolkit. A compact selection will get you back on the road fast and reduce the chance of a long walk. Here are the items I recommend for riders and triathletes who value speed and reliability.
- Minitool with chain tool. A compact multi-tool that includes a chain breaker is the most versatile item. It lets you press pins out and back in for quick fixes.
- Quick link or spare pin. Carry a quick link sized for your chain speed. If your chain uses press-fit pins, carry a spare pin and the chain tool to install it.
- Small set of spare bolts and a basic wrench. For securing accessories or replacing loose components, a few spare bolts and a wrench are useful. Some riders also carry a short length of chain for emergency bypass.
- Rag and small lube. A small cloth and a travel-size chain lube keep repairs clean and working. Wipe the chain after a fix and apply a drop of lube to reduce friction immediately.
Before long rides or races, test the kit at home. Practice using the tools so you can work quickly under stress. If you prepare, a bike chain break becomes a short delay instead of a race ender. Triathletes often add extra items to a gear list, aiming for simple solutions to common problems. If you also manage swim gear, you might see searches for fix leaky wetsuit among training checklists. For equipment problems beyond chains, many riders look at gear issue solutions when planning maintenance.
Key Takeaways
Bike chain break is frequent but manageable with the right knowledge. Move to safety first, inspect the damage, and decide if a roadside repair or a shop visit is best. Calm action prevents further harm to the bike and keeps you safe on the road.
Carry a basic kit: a chain tool, quick link or spare pin, rag, and small lube. Practice common fixes at home so you can act quickly when hours matter. Regular cleaning and measuring chain wear prevent most breaks.
At home, do a full replacement if the chain shows wear or multiple damaged links. Match chain speed ratings to your cassette to avoid future failures. After any repair, test the drivetrain and adjust the derailleur for smooth shifting.
As a triathlon journalist and rider, I encourage active maintenance and habit building. Knowing what to do when a bike chain break happens keeps you riding with confidence. Remember, short practice sessions in fixing chains pay off with big race day peace of mind and fewer surprises on training rides.